
|
 News
News
Reducing rebuilding costs after a flood
|
Subscribe to FREE newsletter
| Nov 05, 2018 |
Homeowners now have a way to keep post-flood, salvaged personal possessions secure during the rebuild of masonry facade homes.
A flood is an unexpected and terrible event to witness and endure. Recently, our nation has experienced more severe floods than in the past, and flooding is a difficult natural disaster with which to contend. Flood water will find its way into everything you own below the water level line.
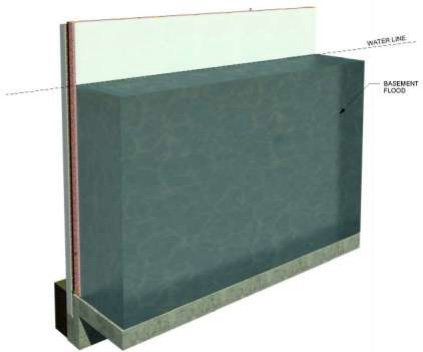
It saturates all personal property, the inside and outside of your dresser of clothing, the inside of your cabinets, boxes of stored food, and every page of every book it can find. Water also goes into places you may never have considered, such as sofa cushions, kids’ toys, doors, and the inside of walls.
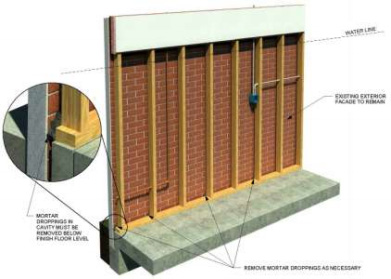
Mortar Net Solutions is offering homeowners a way to keep any salvaged personal possessions secure during the rebuild of homes with masonry facades. The existing façade is allowed to remain in place while all reconstruction is performed from the inside of the structure. The No. 1 priority is to keep the home locked up and secure.

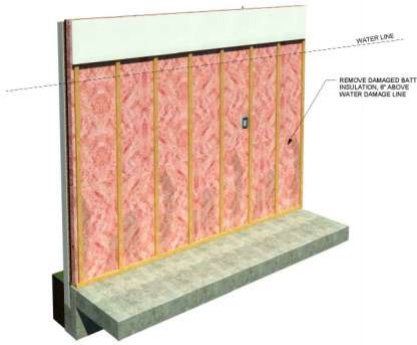
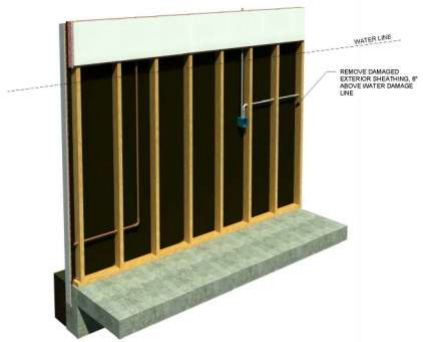
The process begins with the removal of all wet and damaged building materials from the inside of the structure. Eliminate water and electrical supply to the areas where work will be performed. The drywall, polyethylene, batt insulation, exterior sheathing and any rigid insulation that may exist are pulled through the studs and discarded.
Once the bulk material is removed from the wall, the sheathing that is remaining between the wall ties and the studs, as well as mortar droppings at the base of the wall, can be removed. Any products used to prevent mold would be applied at this point, along with fans to assist and speed the drying time of remaining materials.
Steps to shorten reconstruction times
Step 1. Remove damaged materials vertically in twofoot increments and six inches above the highest recorded water level
The incremental measurements will reduce material waste, simplify cutting, and make computing required materials for the project easier.
Step 2. Inspect all wiring connections and plumbing lines within the interior of the walls prior to reconstruction
Plumbing and electrical lines will have pressure applied to them as the demolition process takes place and can result in the need to tighten and reconnect fittings. Inspect electrical junction boxes for debris or mud, which can accumulate in the lower areas of the walls. Wall ties should be inspected and evaluated for integrity. If the wall ties are slightly loose, the application of the closed cell foam, described later in this article, will compress between the wall tie and the stud offering a tie that can resist lateral pressures. The local building inspector (code official) will typically determine acceptance of current in place ties and recommend what is required for your jurisdiction.
Applications that require post-applied facade anchorage can be completed using ties engineered and manufactured by Construction Tie Products (CTE). CTE offers an anchor that is attached to the interior stud and drilled into the inside face of the brick facade. The helical anchor installs efficiently and is a cost-effective repair anchor. The anchor does not disturb the exterior of the building, and all the hardware is concealed within the building envelop. The retrofit tie is stronger than the original mortared tie that is in the original brick facade (typically light gauge corrugated). The bracket is supplied with the required hardware for a stable connection to the existing stud (wood or metal). This anchor is easy to install and offers the building owner a sound and wellperforming anchor. Once the walls are dry and inspected, the placement of new wall components can begin.

Step 3. Drill weeps into the facade at the brick shelf level
The brick shelf is located at the bottom of the wall, where the brick sits on a small recessed ledge located at or just below the finished floor level. This brick ledge is where you would find the base of the wall flashing, if the original builder installed it. Weeps should be drilled in based on your local building code standards (typically less than 33 inches), but it is recommended they be placed at 24 inches on center, or at every three brick head joints. (A head joint is the vertical joint found between in-place masonry units).
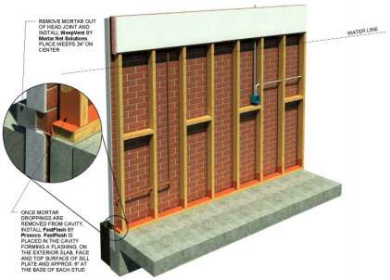
Step 4. The weeps must be drilled with no smaller than a 3/8-inch diameter masonry bit
beginning at the bottom of the bed joint located on the brick shelf. (A bed joint is the horizontal joint found between in-place masonry units.) This is important, because if you drill the weep ¼ inch above the brick shelf, then ¼ inch of water will need to accumulate in between the inside framed stud wall and the inside face of the brick (the wall cavity), creating an everlasting puddle of water that can create big trouble for the homeowner.
Whether the original builder installed base wall flashing on the brick shelf is irrelevant. This can be addressed with fluid and gunnable (able to be placed using a 20-ounce caulking gun) product manufactured by Prosoco. The product is FastFlash, a polyether material that is released from the caulking gun, and troweled smoothly into place, creating a flexible flashing that will allow any accumulated water at the interior base of the cavity wall a path to the weeps. Even though the wall will be dry during construction, the brick will allow moisture to pass into the cavity throughout the life of the structure. Therefore, future moisture will always need a way to weep from the cavity.
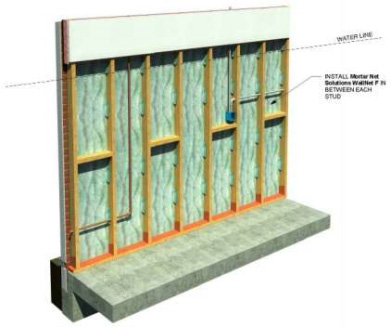
Step 5. Once all inspections have been completed, Mortar Net Solutions’ FloodNet, a new concept in cavity drainage and ventilation, can be placed between the studs in all exterior walls
FloodNet is an entangled mesh that automatically creates a ventilation and drainage channel that fits and fastens with staples vertically between the studs. Moisture that passes through the wall veneer and into the cavity now have a dedicated and clear path to drain to the weeps. FloodNet is precut to fit around existing wall ties and designed to be shingled as more vertical pieces are required.
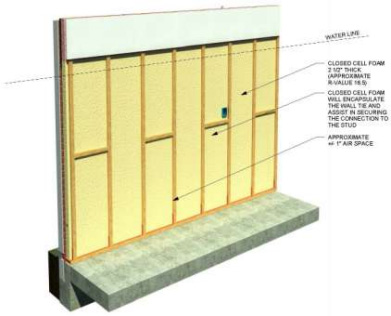
Once the FloodNet is secured, installation of the closed cell foam can occur. It is important to hold the foam back about one inch from the inside face of the studs. The space that remains between the installed foam and inside face of the drywall can easily allow for communication cables to be installed at a later time.
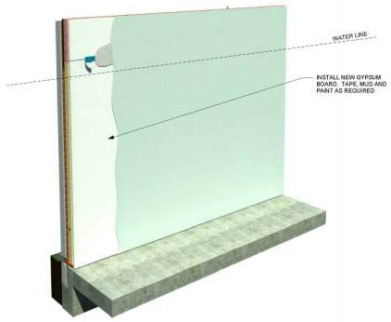
Once the second wall inspection has been approved in the completion of the wall rebuild, the drywall installation can take place. If the original construction utilized a layer of polyethylene between the stud and the drywall, it would be important to consult with the local building official to determine if replacement will be required by local codes.
By Steven Fechino
For other relevant searches, you might want to try:
| (03 15 00) Concrete Accessories (04) Masonry (07 10 00) Dampproofing and Waterproofing (07 19 00) Water Repellents (07 77 00) Wall Specialties |